Flying The DJI Phantom in 40mph winds: A Wind Turbine Drone Adventure Story and Crash from Maui7/5/2014 Windmill Drone Adventure from Justin Edwards on Vimeo. My friends Marty and Ian from DroneMaui.com invited me to go on a hike up the west Maui mountains to get some footage of the wind turbines on the 4th of July around 5am. I was really tired and tried to get out of it but they talked me into going and I am so glad I went, it turned out to be an awesome adventure!! To make things more interesting, I had to be somewhere at 8am so my wife could play tennis so I had added pressure from the wife department. The hike was about 3 miles up some fairly difficult terrain, plus we had tons of gear with us. We tried to get up there as fast as we could but it still took an hour or more at a grueling pace. When we finally got to the top, the wind was absolutely blasting, but after that steep hike I was not about to miss my chance to fly around the windmills. I took off and tried to head into the wind, but as I got farther away, the intensity of the wind increased and it was soon pretty obvious I was not going to be able to fly back to my take off spot. Full stick into the wind and it was still going backwards. If it was not for Ian's groundstation and Marty's line of sight spotting, I would almost certainly be without my phantom (and video card!!!) Once I realized that the drone was not coming back, I had to start thinking about the best way to get it on the ground but I had to have it land before it flew into one of those wind turbine blades. I had to then run another mile (remember the wife time obligation?) to look for it. The drone gods must have intervened because it appears I landed about as perfectly as possible, blindly!! I am really lucky. I love adventures and this was an awesome one. I wish I could have gotten more than 20-30 seconds of wind turbine aerial footage but mostly I am thankful to still have a working quadcopter. Be sure and check out the pictures from our adventure below. Do you have any adventures to share? Please share in the comment section!
Comments
I got a chance to film SUP world champion Ekolu Kalama at Ho'okipa and I was lucky enough to capture this clip. I have watched this over and over and just can't get over the level of style this guy has. World class. If you need some inspiration, just watch this a few times. This was filmed from a DJI Phantom 2 with theGoPro Black set on 720p 120fps. 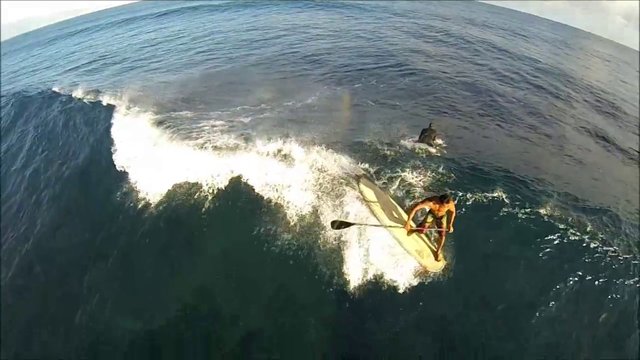 If you want to get a video downlink or use video goggles like the FatSharks for some immersive FPV flying, you will need to make some simple modifications to your Phantom 2. It is much simpler to do than on the original Phantom and has obviously been built with us FPV guys in mind. There are a number of awesome changes and updates in this version of the Phantom that you can read about in this blog post about my first impressions and flight testing. I have seen other people selling ready made cords that plug directly into the board of the phantom, but I didn't want to go that way because it is so easy to just solder a few wires and be ready to go! 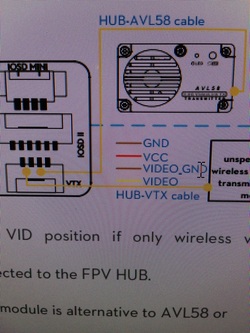 The first thing I did was to confirm the wire layout of the FPV cable that sticks out of the bottom. The yellow video wire and the VCC/GND are the ones you need. 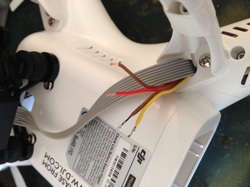 Splice the wires and pre solder them. 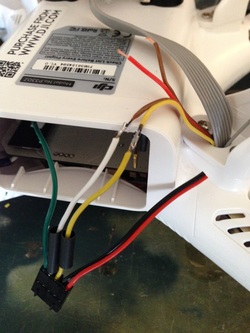 I am pretty sure you only need to do the yellow wire because I noticed that I actually soldered the video ground to the audio input on my immersion video tx. Next step is to solder on a male JST connector or the immersion RC power plug. The red wire is positive while the brown is ground. Dont forget to put your heat shrink tubing on before you solder everything together - electrical tape makes your install look pretty crappy and is not as reliable 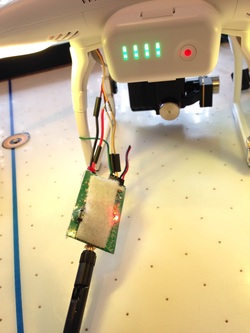 Now plug everything in before you heat shrink your tubing and do a test to make sure everything is working. This is my 100mw Immersion TX I am going to use until my new one gets here. 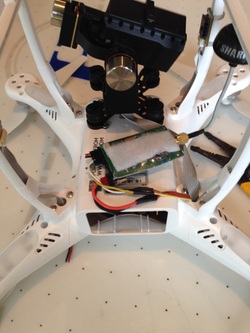 My installs are never super clean or neat, you could easily clean this up. I like to get flying as fast as possible. I plugged it in, tested it, and was flying in no time. The total time to install the gimbal and convert to an FPV rig is easily under 2 hours if you take your time. There are also other even simpler ways to install an FPV video transmitter, but this is the way I did it. If you have any questions, please post in the comments below. If you are considering purchasing a Phantom 2 with the Zenmuse gimbal, you can buy one here from Amazon for $869 with free shipping. I also like UAVProducts.com.  |
 Archives
June 2017
|